Showing posts with label handmade. Show all posts

Thursday, 8 May 2014

Mother's Day Gift Ideas

With Mother's Day just around the corner I wanted to share a few gift ideas that I put together to celebrate this special day. This year I also wanted to celebrate a few Momma friends of mine as well as my own Mom. 
These gifts didn't cost a lot of money and all the decorative touches I had on hand. I didn't want them to be complicated but it was important to me to have them be special and have a handmade touch. 

As far as I am concerned you can never go wrong with flowers & chocolate. I put the tulips in a mason jar & tied a fabric bow. I found the chocolates at Safeway.

The first photo is a cookie packaged in a glassine bag. I had intended on baking homemade cookies but decided against it considering I have been sick... that and it was easier to lay on the couch and sleep. I folded the bag top down, added the fabric, pattern paper, a stamped tag and then sewed it all together. 
The second photo is a little nail love package. The cloth bag I had from a past purchase from Studio Calico. I then sewed on crepe paper and the pattern papers and stamped tag.

This is my favorite mug and I think every woman should have one so they can open their cupboard in the morning and be greeted by this sweet message. In this is a box of the chocolates and a gift card to Starbucks. I added a flag that I created using a paper straw, pattern paper and a stamped sentiment.

This is a candle paired with a mason jar I filled with lavender epsom salts. To glam this up I painted the lid rim, added fabric over the lid and then tied on a stamped tag & metal heart clip with ribbon and twine.

Plants are always great gifts (well I think so). I put the plant in a pot that I had spray painted gold and then added another of those flags from before. It looks pretty cute with the flag and it has me thinking more of my plants need flags.

I am not too sure what we're doing for Mother's Day around here I just hope that whatever bug I currently have is gone. I do know that I get a delicious breakfast, I am just trying to decide between french toast, pancakes and eggs benedict. Other than that I just really hope our weather turns around and stops being miserable so that we can get outside and enjoy some sunshine. I have been cooped up for too many days.
For all you Momma readers- Happy Mother's Day! Have a wonderful Sunday!
xo

Monday, 22 April 2013

Let's Go Fishing DIY


I can not even tell you how excited Anna was when she found out I was making her fish so she could go fishing like her Daddy. It was a constant "are you done?are you done?are you done?" until I had the first one complete. I can't say I wasn't just as excited as she was to see how it would all turn out.
I can remember playing a similar game at a church penny carnival when I was little and I had seen an image on Pinterest awhile back so when I got the urge to create something fun for her I knew this was it. We made a quick trip to Lowes for supplies and then home to dig through my fabric left over from quilts and pillows. The total cost for supplies from Lowes was $11.85 & I have cord and magnets left over. I had craft eyes but these can be picked up from dollar stores or craft stores.

Supplies
dowel(s)
fabric (I used scraps I had from past projects)
rope or cord (mine=braided nylon cord)
magnets (reasonably strong)
batting or something similar to stuff fish with
craft eyes
paper (I used a 6x12 piece of cardstock)
Tools
glue gun
stick pins
pencil
sewing machine or needle & thread

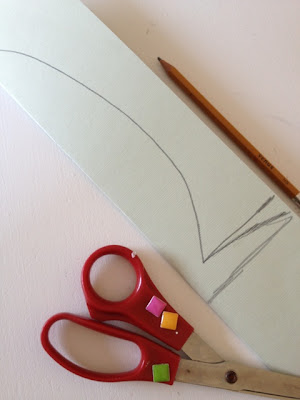
Step 1: fold paper in half and trace fish body, cut out

Step 2: You need 2 pieces of fabric. Place your fabric right sides together and trace your fish

Step 3: stack your batting and fabric, pin together

Step 4: Cut out

Step 5: take out your pins and put your bottom piece of fabric down, then the batting. I have added in a couple pieces of scrap batting to add bulk to my fishes body

Step 6: glue one magnet onto the batting. Place magnet far enough into the fish body to allow for sewing.

Step 7: Put top piece of fabric on and pin fish together.

Step 8: Sew, leaving a quarter inch seam.

Step 9: glue an eye to each side. Repeat for all fish needed.

Step 10: Cut a decent length of cord, mine is a little longer than Anna is tall, plus some to wrap around the dowel. 
Step 11: Add glue to your dowel and wrap cord around.

Step 12: Add glue to magnet, add cord, glue other magnet on top. The magnet themselves stick together but will pull apart when removing the fish if you do not add glue.

Step 13: GO FISHING!!!!

If you have any questions please email me at nadinekaren@ymail.com or leave a comment.
Nadine